Somnofit-S/-B anti-snoring orthosis
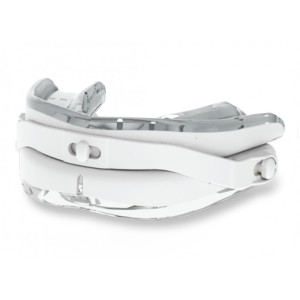
Discover SOMNOFIT-S/-B, the most advanced and innovative anti-snoring mandibular advancement orthosis on the market. This orthosis is a medical device renowned for its effectiveness against snoring and sleep apnea, yet it's 30% smaller than its big sister: the SomnoFit orthosis.
Download and print your size guide.
Our anti-snoring orthosis: SOMNOFIT-S/-B
The SOMNOFIT-S/-B anti-snoring orthosis is a thermo-formable mandibular advancement orthosis. Its principle of action is clinically recognized as effective against snoring and moderate sleep apnea (CPAP / PPC)
Its new patented design offers unrivalled comfort at night. In fact, its volume is reduced by 30% compared with other anti-snoring orthoses on the market, such as our classic Somnofit orthosis. It is rated No1 ++Testsieger++ in the German orthosis test!
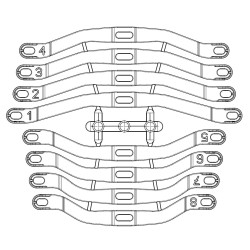
The anti-snoring orthosis comes with 8 bands for perfect, effective adjustment to your situation and teeth.
How the SOMNOFIT-S/-B mandibular advancement orthosis works
Can't stand snoring? During sleep, the SOMNOFIT-S/-B orthosis moves the lower jaw forward a few millimeters. This movement frees the base of the tongue, opening the way for inhaled air. This proven method is highly effective in reducing snoring and sleep apnea. In the event of sleep apnea, the advice of your doctor or a healthcare professional is recommended.
The SOMNOFIT-S/-B orthosis provides a restful night's sleep and a truly restorative sleep. Its small size ensures the best mandibular comfort for snorers. Find out more here.
SOMNOFIT-S/-B orthosis packaging contents
The SOMNOFIT-S/-B anti-snoring orthosis consists of the following components:
- Two dental splints (one upper and one lower) that can be thermally adapted to your teeth.
- An impression plate.
- A temperature indicator for thermoforming.
- Ventilated storage case.
- An assortment of 8 soft bands for mandibular advancement adjustment.
- Instructions for use.
Orthosis instructions for use
1. Fill a pan with cold water to a height of 7 to 8 centimetres and place the temperature gauge inside. Heat the water until the center of the indicator turns from green to red (optimal temperature). Once this temperature has been reached, switch off the heat source. Leave the top gutter in the hot water for 3 minutes. (Do not use boiling water). Be sure to remove the product from the pan and take the impression within 10-15 seconds.
2. Stand in front of a mirror. Remove the product from the hot water with a spoon, shaking it to remove the water. Insert the tray, aligning the central hook with the slot between the upper central incisors. Adjust the width of the tray to the size of your jaw so that the molars are correctly inserted.
3. Hold the product with one hand and grip the impression plate with the other. Bite down firmly to make the impression. Hold your teeth tightly together and press your fingers against the faces of the product to obtain a perfect mold of your teeth. Release the pressure on your teeth and rinse your mouth with cold water. Leave to cool for 2 minutes, keeping the tray in your mouth.
4. Keep the upper tray in your mouth, but remove the impression plate. Repeat steps 1 to 3 for the lower tray, without using the impression plate. Align the central slot of the lower splint with the hook of the upper splint.
5. Detach strip number 4 using a cutter or pair of scissors. Keep the other strips. Insert the upper gutter hook into the center hole of the strip and turn a quarter turn. Place the holes at the end of the strip on the hooks of the lower gutter and turn a quarter-turn to lock them in place.
6. Enjoy sleep apnea-free nights with these anti-snoring and anti-sleep apnea splints!
⚠️ The comfort and fit of aligners depend on the shape of the teeth, the number of teeth and the quality of the dental impression. Make sure that the shape of your teeth is correctly reproduced in the tray. If this is not the case, redo the impression, respecting the temperature and applying sufficient pressure to form the device. If necessary, you can cut away any awkward parts of the thermo-forming material.
See the SomnoFit-S instruction video.
See SomnoFit-B instruction video.
How to clean and care for your mandibular advancement orthosis
For daily care of your SOMNOFIT-S anti-snoring brace, we recommend using a denture disinfectant. Simply immerse the splints in lukewarm water (around 35°) with a disinfectant tablet for at least 30 minutes. You can leave the anti-snoring brace immersed in this solution all day long. However, don't forget to rinse it thoroughly under running water before putting it back in your mouth.
Product delivery / Shipping
We offer free delivery in France for all orders over €50. Delivery in 3 to 4 working days.
If you have any questions about the anti-snoring brace, whether they concern fitting, use, product quality, effectiveness, expected results or payment terms, please do not hesitate to contact us.
These anti-snoring products have been designed to make your nights easier. Don't hesitate to give us your opinion on these dental orthoses!
Discover our other anti-snoring products: SOMNOFIT anti-snoring orthosis, nasal dilator, anti-snoring pillow, anti-snoring belt and many more.
Find all our blog articles here.


